GA4

This guide helps you to connect fraud0 with your Google Analytics (GA4) account. This set up is optional. There are a total of 4 steps you need to take to display unwanted traffic in Google Analytics.
Follow these steps:
Implement Google Analytics (GA4) Tag (Step 1/4)
Create Custom Dimension (Step 2/4)
Check the Custom Event (Step 3/4)
Create Segment and Audience for Invalid Traffic Exclusion (Step 4/4)
Please note
We would like to point out that Google Analytics only filters out a small portion of bot traffic and the Google Analytics tag usually fires AFTER consent - both can lead to different numbers in your Google Analytics and the fraud0 interface
🚫 This functionality is not available for trial customers
Implement Google Analytics (GA4) Tag (Step 1/4)
Step 1: Implement Google Analytics (GA4) Tag in Google Tag Manager
Go to your Google Tag Manager Workspace
Navigate to Tags (1) and click New (2) in the top-right corner
.jpeg?inst-v=aaf91e11-f2af-4ef7-bbb7-511b89a9e06b)
Within the Tag Configuration section select Google Analytics: GA4 Event
Give your tag a name GA4 - Event - fraud0 (1) and select your GA4 Configuration Tag (2) (here: “GA4_master_tag”)
Use fraud0 as Event Name (3)
Add a new row in the User Properties section (4) and type in
fraud0_traffic_status in the Property Name column and
{{DLV F0}} below Value
The code above makes sure you get the Value dynamically filled with the values previously defined.
In the Triggering section (5) you need to assign the F0 Trigger you have created before
Learn more:
Click on Save
Create Custom Dimension (Step 2/4)
Step 2: Create Custom Dimension in Google Analytics (GA4)
Go to your Google Analytics Account
Open the Admin area
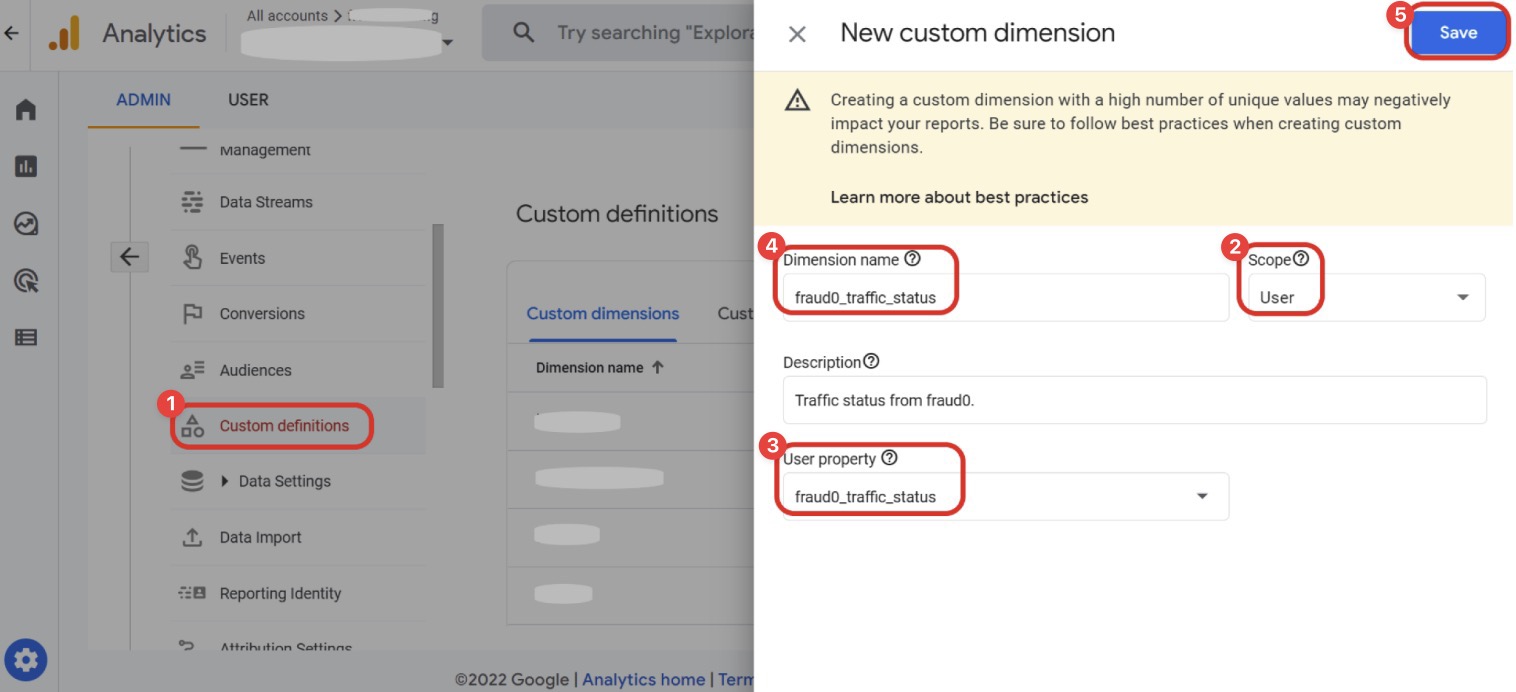
Click on Custom definitions (1) and click on Create custom dimensions
Choose “User” (2) as Scope
Enter “fraud0_traffic_status” (3) as User property
If you like, you can also set “fraud0_traffic_status” as the Dimension name (4) (the Dimension name can alternatively be created according to your GA4 naming conventions)
Add a description if you like

Click on Save (5)
Check the Custom Event (Step 3/4)
Step 3: Check the custom event in Google Analytics (GA4)
To validate the fraud0-event in Google Analytics (GA4), you need to trigger the custom event with the GA4-tag first and check if the event is properly sent to your property.
Go to your Google Analytics Account
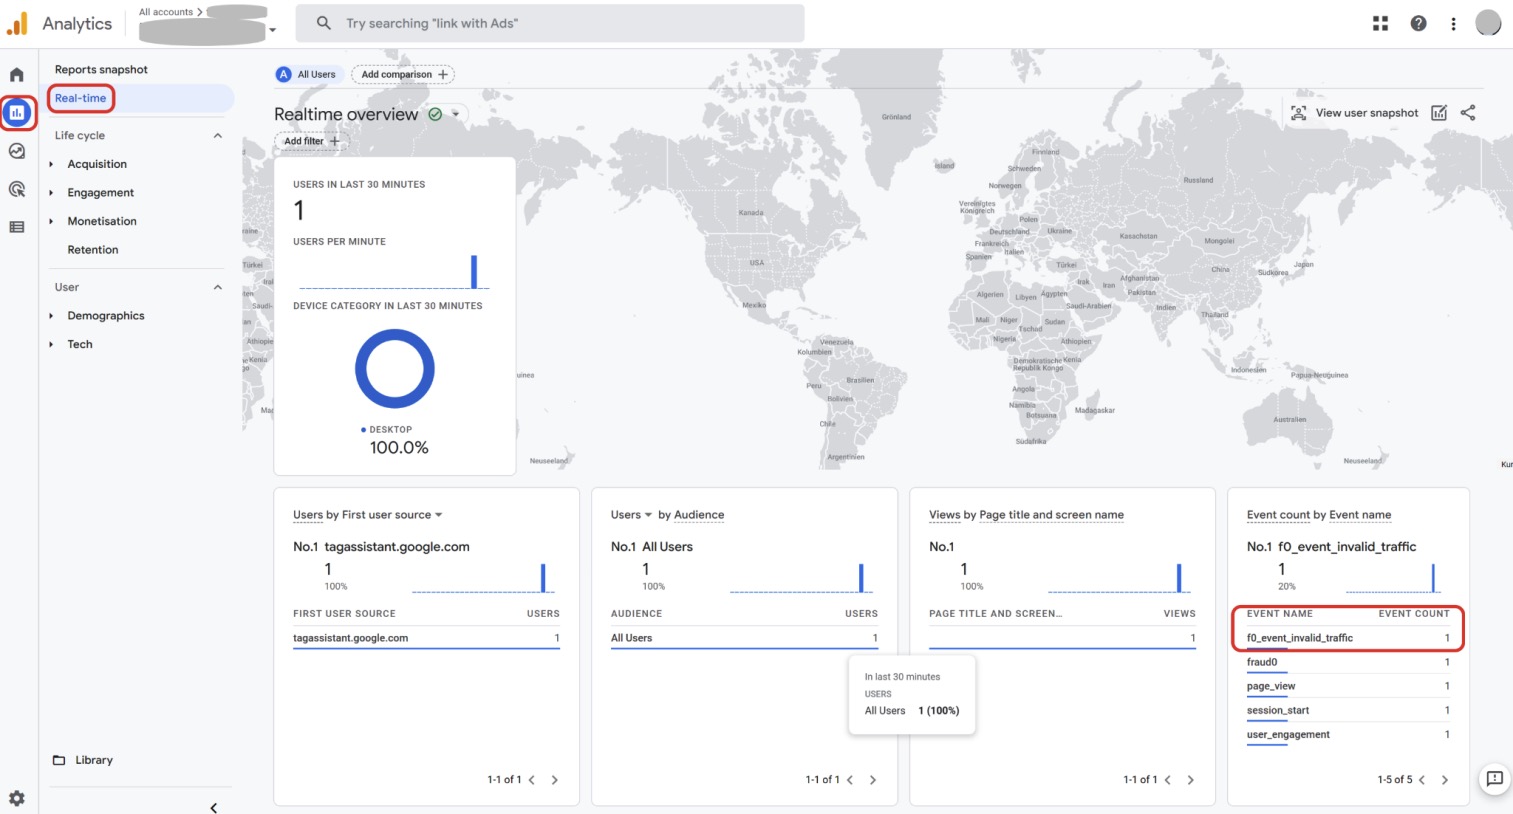
Navigate to your property and go to Reports -> Real Time overview in the left-hand navigation bar

You should now be able to see the F0-event in the Event count by Event name tile
Please note
The real-time report only shows data that has been collected in the past 30 minutes.
Create Segment and Audience for Invalid Traffic Exclusion (Step 4/4)
Step 4: Create segment and audience for invalid traffic exclusion in Google Analytics (GA4)
In Google Analytics (GA4) you can create segments that can be used within Google Analytics (GA4) to filter reports, and you can create audiences. Segments can also be made usable as an audience. The setup of segments and audiences works very similar, there are just different entry points.
a) Create Segment
b) Create Audience
a) Create Segment
Follow these steps to create a segment in Google Analytics (GA4) for the visualization of invalid traffic in your reports.
Go to your Google Analytics Account
Navigate to Admin in the left-hand navigation menu and open it.
Click on Segments in the Data Display tile.
Click on New Segment.
In the overlay titled “Build new segment” click on User Segment.
Now you can create the following segment:
F0 segment for invalid traffic
Give your audience a proper name (e.g. “F0 segment for bot traffic”)
Select the “fraud0_traffic_status” parameter in the menu (below Dimensions → Custom → User scoped) and add the condition “exactly matches ( = )” “yes” (do not check “at any point in time”)
Click on Add group to exclude, select again the “fraud0_traffic_status” parameter in the menu and add the condition “contains” “no” (do not check “at any point in time”)
Optionally, you do have the possibility to directly build an audience out of this segment by checking the Build an audience option (4). If you decide to do this, set the Membership Duration to Set to maximum limit
Click on Save.
Optionally, you do have the possibility to directly build an audience out of this segment by clicking on the three dots and then Create an audience.
If you decide to do this, set the Membership Duration to Set to maximum limit
This new segment can now be used within the Exploration to filter the visualized data.
b) Create Audience
Follow these steps to create an audience in Google Analytics (GA4) for the visualization of invalid traffic in your reports.
Go to your Google Analytics Account
Click on the Settings symbol in the lower-left corner and then on Audiences within Data Display
Please note
You need access rights to the property with the role Marketer in Google Analytics (GA4). More info: https://support.google.com/analytics/answer/9305587?hl=en#zippy=%2Cgoogle-analytics%2Cuniversal-analytics
Click on New audience
Within the overlay, click on Create a custom audience within the Start from scratch section
Another overlay opens and provides you with the possibility to create the following three audiences:
F0 Audience for invalid traffic
Give your audience a proper name (e.g. “F0 audience for bot traffic exclusion”)
Select the “fraud0_traffic_status” parameter in the menu (below Dimensions → Custom → User scoped) and add the condition “exactly matches ( = )” “yes” (do not check “at any point in time”)
Click on Add group to exclude, select again the “fraud0_traffic_status” parameter in the menu and add the condition “exactly matches ( = )” “no” (do not check “at any point in time”)
Set the Membership Duration to Set to maximum limit
Click on Save.
You did it!
The new audience will start with collecting data and accumulating users who meet the conditions from that point onward.
Please note
Currently, you cannot edit the settings of an audience in Google Analytics (GA4).
When you create a new audience, it can take 24 – 48 hours for the audience to accumulate new users (even after initial audience creation). In general, when a new user meets the audience criteria, it can take a day or two for that new user to be included in the audience.
When you create an audience, Google Analytics (GA4) adds any users who have met the audience criteria during the last 30 days (assuming you have at least 30 days of data).
As you define your audience, the Summary card updates with the number of users who have met your criteria during the last 30 days, so you have an idea of the potential audience size.
More info: https://support.google.com/analytics/answer/9267572?hl=en&ref_topic=9303474#zippy=%2Cin-this-article
Next Steps
Please have a look at our setup guides:
Need support?
Do you still have questions or require further details? Contact our support team for assistance!
